Extending EntLib VAB - Part 2.1: Create custom validators and integrate that with EntLib CABC
Here is the second last installment post of this series. If you are interested in checking the earlier posts here are the links:
- Extending Enterprise Library (EntLib) Validation Application Block (VAB) – Introduction
- Extending EntLib VAB - Part 1: Enable client side support EntLib VAB and align the validation error keys with MVC ModelState keys
I strongly suggest to check at least part 1 of this series as we are going to reuse here a component that we have developed in that post.
In this post we will see how to develop a custom validator for EntLib VAB. If you are developing a custom validator, there are several aspects you have to take care for: Obviously the first and foremost is write your actual validator that works on server side and integrate that with CABC, next is to enable client side validation for your validator (now when we are talking about client side validation, in ASP.NET MVC it is important to write the client side validation in jQuery unobtrusive validation to provide your end user similar kind of experience as they have with other Out-Of-The-Box validators) and lastly as you are working with EntLib provide support so that your custom validator also seamlessly integrates with EntLib Configuration Application Block Console (CABC). In this post we are going to cover all of these.
As I said in the first post it always helps to go through Hands-On Lab on Enterprise Library once. However if you haven’t got time yet to go through that don’t worry, I will cover some the topics here briefly so that my readers can have the complete picture of entire story.
Ok. So to to develop your custom validator start with creating a class that inherits generic ValueValidator<T>. For this post we are taking an simple example to validate a string input for numeric data, i.e. if the string content is found to be non-numeric validator raises and validation error.
So here is our custom validator class NumberOnlyValidator:
public class NumberOnlyValidator : ValueValidator<string>
{
    public NumberOnlyValidator(string messageTemplate, string tag) :
        base(messageTemplate, tag, false) { }

    // Fields
    // Since we are not working with this templates we are returning empty strings
    protected override string DefaultNegatedMessageTemplate
    {
        get { return String.Empty; }
    }

    protected override string DefaultNonNegatedMessageTemplate
    {
        get { return String.Empty; }
    }

    // Your actual validation logic goes here.
    protected override void DoValidate(
        string objectToValidate,
        object currentTarget,
        string key,
        Microsoft.Practices.EnterpriseLibrary.Validation.ValidationResults validationResults)
    {
        double tempDouble = 0;
        if (!Double.TryParse(objectToValidate, out tempDouble))
            this.LogValidationResult(
                validationResults,
                this.MessageTemplate,
                currentTarget,
                key);
    }
}
When you inherit from abstract class ValueValidator<T> you need to essentially implement three members of that class:
//Gets the Default Message Template when the validator is negated.
protected abstract string DefaultNegatedMessageTemplate { get; }

//Gets the Default Message Template when the validator is non negated.
protected abstract string DefaultNonNegatedMessageTemplate { get; }

// Summary: Implements the validation logic for the receiver.
//
// Parameters:
//   objectToValidate:  The instance of T to validate.
//
//   currentTarget: The object on the behalf of which the validation is performed.
//
//   key: The key that identifies the source of objectToValidate.
//
//   validationResults: The validation results to which the outcome of the validation should be stored.
//
// Remarks: Subclasses must provide a concrete implementation the validation logic.
protected abstract void DoValidate(
    T objectToValidate,
    object currentTarget,
    string key,
    ValidationResults validationResults);
Now as we will not be using DefaultNegatedMessageTemplate and DefaultNonNegatedMessageTemplate we have returned empty string from them. The actual server side validation logic goes in the DoValidate() method. To raise any validation error you need to log it using LogValidationResult() as shown in the example.
Now you can define an value validation attribute on top of this validator and start using right away:
[AttributeUsage(AttributeTargets.Property | AttributeTargets.Field)]
public sealed class NumberOnlyAttribute : ValueValidatorAttribute
{
    protected override Validator DoCreateValidator(Type targetType)
    {
        return new NumberOnlyValidator(this.MessageTemplate, this.Tag);
    }
}
However as we are implementing the validation rules using validation configuration xml, we will not going to use this attribute on top of our class property. We will utilize this attribute in some other way.
Now lets see how we can integrate our custom validator with EntLib CABC
There are two ways you can use custom validators with EntLib CABC:
- You can add it in your validation configuration xml using
Add Custom Validatorthen add yourdll(usingAdd From File) in which the validator resides and use it accordingly. In this approach we define a constructor in our custom validator with aNameValueCollectionargument. The idea is to pass the required value (to validate) from validation configuration xml to the class in form ofNameValueCollection. We’ll not discuss on that in this post as we are going to discuss an approach I find a bit cleaner and more integrated with ENtLib CABC (If I have disappointed you by not discussing this, I strongly recommend you to go through the Hands-On lab. This part is described in detail there).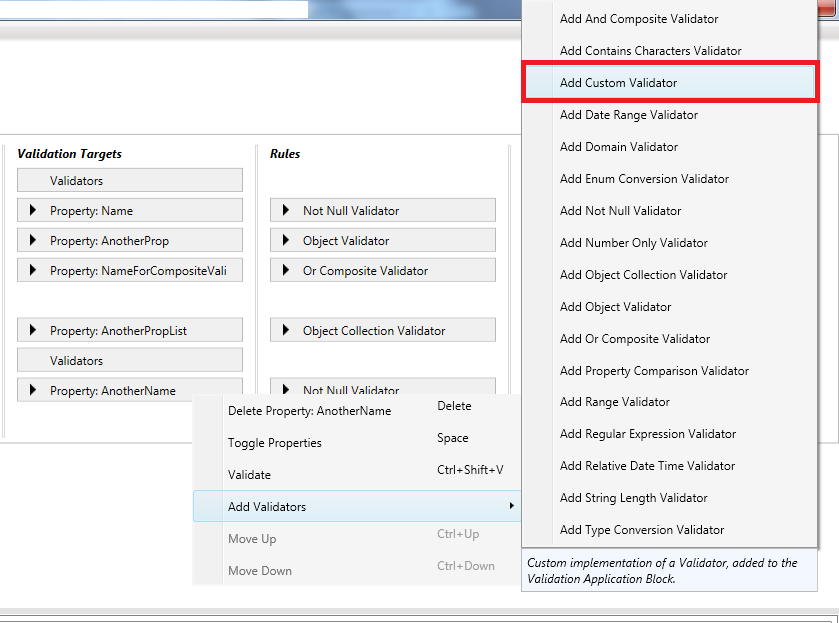
- Integrate with EntLib CABC in such a way that it appear in the list of validators. As per my personal opinion this looks way cooler than the previous approach.
Now to integrate with CABC in either approach you need to define ValidatorData for your Custom Validator. Validator Data provides resources for the validator in CABC UI. The image below depicts the structure:

Resources\NumberOnlyValidatorData.Resx contains all the resources for NumberOnlyValidator and Confiugration\NumberOnlyValidatorData.cs uses the resources and instantiates the custom validator. Now if you are thinking what on the earth is NumberOnlyAttributeAdapter, hold your horses, we will discuss that too at right time. Let’s stick to ValidatorData for now.
Ok so in the .resx file add the entries as shown below:

Remember to change the AccessModifier to public for the resource file. Now utilizing this resource create custom validator data class inheriting from ValueValidatorData.
using NumberOnlyValidatorDataResx =
    Validation.CustomValidator.Resources.NumberOnlyValidatorData;
namespace Validation.CustomValidator.Configuration
{
    [ResourceDisplayName(typeof(NumberOnlyValidatorDataResx),
        "NumberOnlyValidatorName")]
    [ResourceDescription(typeof(NumberOnlyValidatorDataResx),
        "NumberOnlyValidatorDescription")]
    public class NumberOnlyValidatorData : ValueValidatorData
    {
        // ctors
        public NumberOnlyValidatorData()
        {
            this.Type = typeof(NumberOnlyValidator);
        }
        public NumberOnlyValidatorData(string name) :
            base(name, typeof(NumberOnlyValidator)) { }

        protected override Validator DoCreateValidator(Type targetType)
        {
            return new NumberOnlyValidator(this.MessageTemplate, this.Tag);
        }
    }
}
There are few things to note about this class:
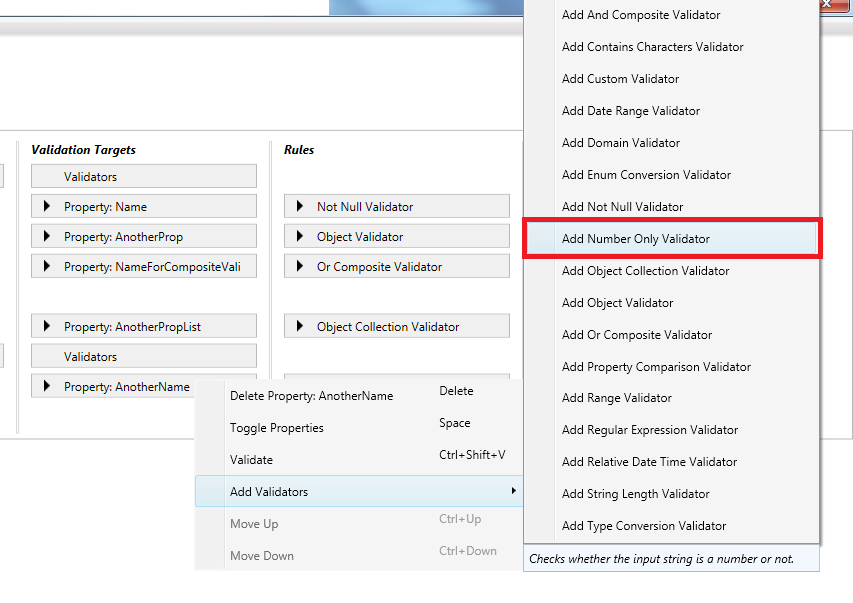
- Note that we have used the resource file keys in decorating the class with
ResourceDisplayNameAttributeandResourceDescriptionAttribute. These simply to generate the desired text for the validator name and description. If you check the below image you will notice that the key value used inResourceDisplayNameAttributeis appearing as theAdd <ValidaotrName>in the list of available validators and key value used inResourceDescriptionAttributeappearing as the validator description at the end of the validator list. - Check the default constructor. This constructor will be called when we will try to add this validator from EntLib CABC. Hence, it is very important to specify the type of validator here. Otherwise the type attribute for the validator will come as empty and at runtime we will not get the expected behavior.
- We also need to override one virtual function
DoCreateValidatorto return our own custom validator.
// Summary: Creates the Microsoft.Practices.EnterpriseLibrary.Validation.Validator described
//     by the configuration object.
//
// Parameters:
//   targetType: The type of object that will be validated by the validator.
//
// Returns: The created Microsoft.Practices.EnterpriseLibrary.Validation.Validator.
//
// Remarks: This operation must be overriden by subclasses.
protected virtual Validator DoCreateValidator(Type targetType);
- The thing we have done with
ResourceDisplayNameAttributeandResourceDescriptionAttributefor the class can also be done for any property of the class. We are going to discuss briefly on this (note that the things I am going to discuss now in this point, is not shown in the sample project we are following, hence if you wish you can skip this discussion). Suppose in your validator you are making a slight change: besides checking the validity of the input you also want to put onebooleanfieldIsRequiredin the class, which if set totruewill also make the field mandatory. So it is pretty obvious that the value for this field should also come from the EntLib CABC. So for that purpose we need to define similar property in our custom validator class as well as shown below:
[ConfigurationProperty("isRequired")]
[ResourceDescription(typeof(NumberOnlyValidatorDataResx),
    "IsRequiredDescription")]
[ResourceDisplayName(typeof(NumberOnlyValidatorDataResx),
    "IsRequiredName")]
public bool IsRequired // Strongly typed attribute
{
    get
    {
        return (bool)this["isRequired"];
    }
    set
    {
        this["isRequired"] = value;
    }
}
So the idea is to make this property available in EntLib CABC and when you will save the validation configuration xml, there will be an attribute named isRequired which will be a part of validator element in the xml (i.e. serialized version of the validator) so that the same can be retrieved at the time of deserializing the xml. Needless to say that this property can be utilized in DoCreateValidator method while instantiating custom validator.
Now we need to associate the ValidatorData with the CustomValidator.
// Declare the type of ValidatorData associated with the Custom validator.
[ConfigurationElementType(typeof(NumberOnlyValidatorData))]
public class NumberOnlyValidator : ValueValidator<string>
{
   /*Rest of the code removed for brevity*/
}
If you have done so far, the next step would be to make the custom validator appear in CABC. To do this, basically you need to make your custom validator dll (in our case Validation.dll) accessible for CABC. You can do this in two ways:
- Copy the
dllto the same directory in which the exe of CABC is (EntLibConfig.exe/EntLibConfig-32.exe). Do this if you have not installed EnterpriseLibrary Config extension for visual studio. - Add the relative path of your custom validator
dllto the EntLib path of your solution. In case you have installed EnterpriseLibrary Config extension for visual studio, you will find this approach more useful. Note: do not remove the existing paths, instead just append yourdll’s path. Check below image for reference:
Now when you open your validation config xml in CABC and try to add new validator, you should see your own custom validator in the Validator list as shown above and now you can apply this validator on properties of your class.
Hope this helps.
Next posts on these series:
Disclaimer: This post is moved as is (with minor formatting change) from my old blog.